Randal R. Ketchem Photography - Random Image

Click on most any image to view it larger on Randal R. Ketchem Photography.
Subscribe using the link on the right to stay aware of new posts.

Sunday, September 23, 2007

Double Processing RAW - Another Example

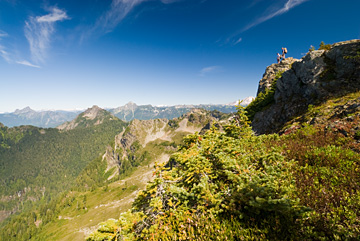
For this shot, the foreground is well exposed, but when correctly processed the mountains are brightened and lose some detail, and the clouds, especially in the upper left region of the image, are blown out completely. The RAW file contains detail in both the foreground and the clouds, so this is a perfect candidate for double RAW processing. First, here is the image processed for the foreground:

Processed for Foreground

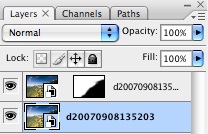
Going back to Adobe Bridge, I open the RAW file as an object in Photoshop, then add it as a layer on top of the foreground layer, as shown here:
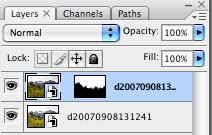
Photoshop Layers
Photoshop Layers

I rename the layer by appending "Background" to the object name so that I can keep track of which layer is which. As you can see, I added a layer mask to the background layer, but did so white, meaning that all of the background layer shows, but none of the foreground layer. I make a selection in the image around the areas I want in the foreground, feather the selection, and use Fill to fill that area of the layer mask with black, meaning that the foreground area will be shown and not the background. From here I clean up the layer mask with a brush, especially making sure that the interface is not noticeable. Ground or trees next to sky are particularly troublesome. It is better to have the ground edge a bit dark, with a feathered edge, than the sky edge bright. Look at the layer mask edge. It is definitely not straight. This exposure compression would be hard to accomplish with a neutral density gradient filter.

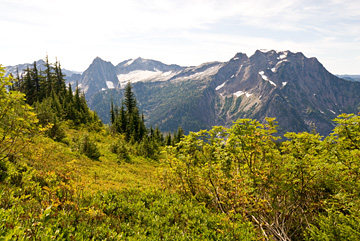
Below is the result. Note the increased detail in the background, especially the clouds.

Big Four Mountain from Mount Dickerman Trail

And that is it. Of course, RAW has a broader range than this, and one could conceivably triple process, but I have yet to try that. If the exposure range is that wide, perhaps you should think of using High Dynamic Range (HDR) imaging or at least taking two different exposures using a tripod to capture an even wider exposure range.

Saturday, September 22, 2007

Double Processing RAW

Many times in landscape photography the exposure range of a scene is beyond the capabilities of the film or sensor to capture. One common technique, put to tremendously successful use by photographer such as the late Galen Rowell, is split neutral density filters. These darken one part of the image, thus allowing the camera to record detail throughout the scene. The filters have some issues for me, though. Primarily, the split is a straight line, and the scenes I shoot rarely have an exposure difference that can be fixed with a straight line. This means that the image will have to be touched up in Photoshop after the fact to account for a meandering region of exposure difference. With digital capture using RAW, however, the RAW file can be double processed, once for the dark areas and once for the light areas, and the two overlayed. This works great as long as the RAW file contains detail across all of the exposure ranges you wish to capture. If the highlights are white or the shadows black, no detail can be recovered.

Double processing is very easy. First process the RAW file for either region. Here is a shot processed for the foreground:

Processed for Foreground

Next I processed the file for the background, darkening it slightly, and layered it on top of the foreground in Photoshop. I selected the foreground region, feathered the selection, and used the selection to add a layer mask to the background layer so that only the background parts of the background processed image show through.

Photoshop Layers
Photoshop Layers

Putting the double processed images together like this results in an image with a better rendition of the exposure as how a human would see it.

Mount Dickerman Summit, Two Hikers

I admit that this is a mild case, but the technique is the same. Do not keep throwing away images because either the highlights are too bright or the shadows too dark. Shoot RAW and double process. If the exposure range is still to large, double shoot on a tripod.

Sunday, September 9, 2007

Lugging Gear, Hiking Mountains

I went on a hike. This is nothing new nor is it out of the ordinary. I go on plenty of hikes (though never enough). Yesterday I went on a great hike. Mount Dickerman. I hiked this trail last year and got some great shots, but it is so beautiful that I had to go back.

Mount Dickerman with Distant Three Fingers View

The problem I have is that I have too much gear (well, not really - that is not possible) and do not want to carry it all up such a hike. So, my first decision was what to leave behind. As this was a hike with stunning views, I could leave my large, heavy macro lens behind. I might find some great macro subjects, but they would have to remain unphotographed. I also decided to leave my Tamron 28-300 behind. While it is possible to sight a large animal, like a bear, that would be sweet to shoot at 300mm (and definitely NOT at 28mm), I did not think this likely. Actually, another hiker that day saw and photographed two bears in the berry patches. I left the 28-300 behind. This left me with my Tamron 11-18, My Nikon 18-70, and assorted filters and cleaning supplies and extras. Then I packed my new Bogen 190XPROB tripod with its Acratech V2 Ballhead, water, and food into my fairly new Tamrac 5549 Adventure 9 backpack.

It was still quite heavy, but I would just have to buck up and carry it. While it would be nice to carry less and hike lighter, a photographer has to be prepared! It was worth it. I only have a couple of shots posted so far, but several more will follow. Here is one for the blog:

Mount Dickerman Cliff

Sure, today I am sore, but I would rather be sore with some photos than comfy and without. If you see me on the trails, be sure to say hello.

Tuesday, September 4, 2007

Touching Up Lens Grit

We all get them - those little black blobs or lines in the image. They come from a number of sources: a dirty filter (which can hardly be helped when shooting on a beach with salt spray blowing), a dirty lens (always clean your lens before using a filter!) or (horrors) a dirty sensor. What can be done about these blobs after the fact? First, do something before the fact. I carry a LensPen with me for touch ups and for its enclosed brush, but for real cleaning I use a micro cloth and solution specifically designed for cleaning optics, such as Eclipse Optic Lens Cleaning Solution. I have not yet tried any sensor cleaning products, but I am interested in the various VisibleDust products.

But I digress. We were talking about cleaning up your images, not your lenses. In the past I would do this in Photoshop with the clone or healing tools on a separate layer. This worked great, unless I decided to tweak the color temperature of the photo layer or something, then all of the locations where I had healed would pop right out of the image and I would have to redo the touch up. Now I do the cleaning in Adobe RAW. Yes, this can be done during the RAW conversion! And what is really nice is that if the RAW file is placed in Photoshop as an object, the RAW converter can be reopened on the object and the spot corrections can be modified. Changing any other setting such as temperature or shadows or vibrance are automatically applied to the corrections.

So the next time you open up that image which on the LCD looked so wonderful and find it full of little dark blobs, try some RAW spot healing. Then get out your real world cleaning tools and clean up your lenses and filters!